
Google Task queues on GCP with Google Cloud Functions
Tech ·At our company Embrosa we have many microservices, that all handle one specific part of our platform. An example is that when a user profile is changed, some of this data is synchronized to other services, by using a Firestore triggered Cloud Function.
This looks like this:

We needed queueing
But, we found that in some situations (e.g. when bulk updating user profiles) the logic for syncing to our backend and 3rd party API’s were causing errors (rate errors, too many connections, etc.).
When we would mass-update 100 profiles, 100 cloud functions would try to do their magic. And sometimes, the receiving Service could not keep up. So we ended up with out-of-sync data as there was no retry (Cloud Functions are triggered once (in general)).
Therefore, we wanted to implement a queueing mechanism, that does 3 things:
- Quickly offload the tasks to be executed, so triggered functions can be done quickly
- Rate limit calling external services
- Ensure that the other services are successfully called, or retried when failing.
Google Cloud Tasks
Luckily we ran into Google Cloud Tasks. With that you can execute, dispatch and deliver tasks asynchronously, while having rate and retry controls among other things. And since May this year Cloud Tasks supports Creating HTTP Target tasks 🎉
Creating tasks is well documented, but what I missed in the documentation was:
- How to send data from one (Typescript) Cloud function to receive in another
- How to make authenticated requests, to keep calling my Cloud Functions secure
So, in this post I will guide you, step by step, how to setup a Task queue, a way to send JSON from one Cloud Function to another and how to make calling Cloud functions secure with authentication.
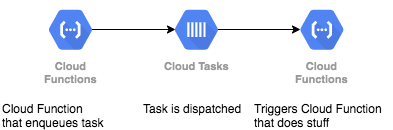
It will look like this:
I assume that you already know how to work with Google Cloud Functions or FireBase Cloud Functions (it is almost the same in this example).
Setup the queue
Make sure you have Cloud SDK and that you are logged in to your project.
Run the following to set up your queue:
gcloud tasks queues create my-queue
It will ask you to enable the Cloud Tasks API (Yes, we want that) and if you don’t have any app engine or regions set up in your project, it will ask you to do so.
This is necessary as your Task queue is based on app engine settings.
If you want to, you can make some adjustments to how your queue behaves:
gcloud tasks queues update my-queue \
--max-concurrent-dispatches=5 \
--max-attempts=3 \
--min-backoff=5s
Check how your queue looks:
gcloud tasks queues describe my-queue
The ‘enqueueing/sending function’
The function that creates the tasks can be normal Cloud Functions, triggered by anything, like GCS, HTTP, Firestore, PubSub triggers, etc.
For Typescript/Javascript you need to make sure you are using the Cloud Tasks Node.js Client: @google-cloud/tasks. On the NPM page there is an explanation on how to use the library but there are two important things to add to make authenticated calls:
OIDC token
GCP Services like Cloud Functions, etc. can automatically validate the inbound OIDC token. This allows for authentication and authorization through IAM policies for the user or service account associated with that token. We use this to securely trigger our receiving function over HTTPS without allowing it to be public.
When setting up the Cloud Function that will be triggered by the task queue, check for the Service account that it uses. Use that email address as the serviceAccountEmail to specify in setting the task on the queue. This is most probably ‘PROJECT_ID@appspot.gserviceaccount.com’.
Content Type JSON
This seems logical once knowing, but if you omit to specify the correct headers, the receiving cloud function cannot use all data you send.
Example
The function setting data on the queue could be looking similar to this:
const { v2beta3 } = require("@google-cloud/tasks");
  const client = new v2beta3.CloudTasksClient();

  const serviceAccountEmail = "PROJECT_ID@appspot.gserviceaccount.com";
  const project = "PROJECT_ID";
  const queue = "my-queue";
  const location = "europe-west1";
  const url =
    "https://europe-west1-PROJECT_ID.cloudfunctions.net/requestQueuedUpdateBackend";

  const payload = {
    foo: "bar",
    key: "value"
  };

  const formattedParent = client.queuePath(project, location, queue);

  const task = {
    httpRequest: {
      httpMethod: "POST",
      url: url,
      body: Buffer.from(JSON.stringify(payload)).toString("base64"),
      headers: {
        "Content-Type": "application/json"
      },
      oidcToken: {
        serviceAccountEmail
      }
    }
  };
  console.log("Sending task:");
  console.log(task);
  const request = {
    parent: formattedParent,
    task: task
  };

  const [response] = await client.createTask(request);
  console.log(`Created task ${response.name}`);
}
Change PROJECT_ID into your project ID and take note of the OIDC token and the headers for setting the request to JSON.
If you execute a function with the above snippet, it will enqueue a task on ‘my-queue’.
The ‘triggered function’
The function that is triggered by the Task Queue will do the actual work. This function will be triggered over HTTP, and therefore must not allow unauthenticated invocations (to prevent abuse).
Furthermore, you want to be able to receive data from the sending function.
The code could be as simple as:
export async function myFunction(req: Request, res: Response) {

  const payload = req.body;
  console.log("Received: ", payload);

  res.status(204).end();
}
Because the incoming data is JSON, we have the original payload object again. So you can make use of payload.foo for instance (= “bar”).
When this function is deployed, take a look at its details (click on the link in of your Cloud Function in the https://console.cloud.google.com/functions/ overview. Check if the Service account is indeed ‘PROJECT_ID@appspot.gserviceaccount.com’.
Keeping it safe
If you look at the [IAM Permissions of your project][6] you can see there is a member with the name “Cloud Tasks Service Account” and the role “Cloud Tasks Service Agent”. We only want this member to be allowed to call our Cloud Function. Its email address will be service-PROJECTNUMBER@gcp-sa-cloudtasks.iam.gserviceaccount.com → remember / copy that address.
In the overview of Cloud Functions, look for your cloud function that is triggered by the Task queue, check its checkbox and look at permissions.
In the block of “Cloud Functions Invoker” make sure there is NOT a member “AllUsers” (publicly accessible). Furthermore, add a member to your Cloud Function Permissions (‘service-PROJECTNUMBER@gcp-sa-cloudtasks.iam.gserviceaccount.com’) and give it the role “Cloud Functions Invoker” (“Ability to invoke HTTP functions with restricted access.”).
That’s it!
You now have set up 3 things:
- A queue that dispatches tasks (receives tasks and calls Google Cloud Functions) with the help of Google Cloud Tasks.
- A Cloud Function that enqueues a task onto that queue (the enqueueing/sending function)
- A Cloud Function that receives the payload over HTTP from the queue, in a secure way.
At Embrosa we are using this in the following way:

And now, the “other services” are not breaking anymore when we have suddenly a surge in the amount of things done on the left side of the diagram, because Cloud Tasks is taking care of limiting the amount of calls and retrying if something might fail.